I am continuing my tutorial / knit-along series for knitting a new long-handled bag, the BYOB Market Bag. If you have missed the previous two posts, then please click here to read the first blogpost in the series, "Pre‐washing your yarns" and then follow the links at the bottom of each page to get back to this point.
So, we have our yarns washed, dried and prepared and we have a good big sample for a gauge swatch, so now let's turn our attention to how we will be casting on for our new bags.
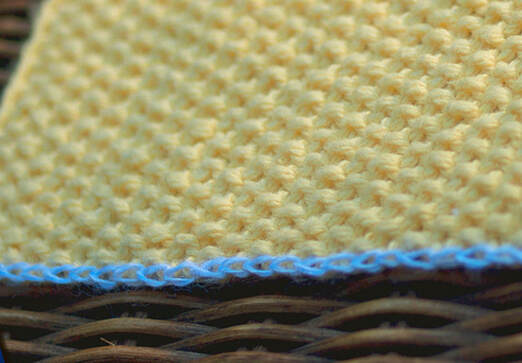
Why use a Provisional Cast‐On?
In the pattern, I have suggested that you start with a Provisional Cast‐On. This is an excellent way to start a piece of knitting with an edge which can be undone later. You will then have "live" stitches which can be picked up and worked in the opposite direction. You can see this cast-on in the photo above as I have used a contrast-coloured blue yarn which will then be undone later..
The Provisional Cast-on is useful in many situations, such as working a scarf from the middle out so that both sides have the pattern worked in the same direction. Or you could use this method to start the rib at the bottom of a child's sweater. When you need to make the item a little longer, you can easily remove the rib and add a little more fabric.
Here are some of the many ways that you can work a Provisional Cast‐On.
So, we have our yarns washed, dried and prepared and we have a good big sample for a gauge swatch, so now let's turn our attention to how we will be casting on for our new bags.
Why use a Provisional Cast‐On?
In the pattern, I have suggested that you start with a Provisional Cast‐On. This is an excellent way to start a piece of knitting with an edge which can be undone later. You will then have "live" stitches which can be picked up and worked in the opposite direction. You can see this cast-on in the photo above as I have used a contrast-coloured blue yarn which will then be undone later..
The Provisional Cast-on is useful in many situations, such as working a scarf from the middle out so that both sides have the pattern worked in the same direction. Or you could use this method to start the rib at the bottom of a child's sweater. When you need to make the item a little longer, you can easily remove the rib and add a little more fabric.
Here are some of the many ways that you can work a Provisional Cast‐On.
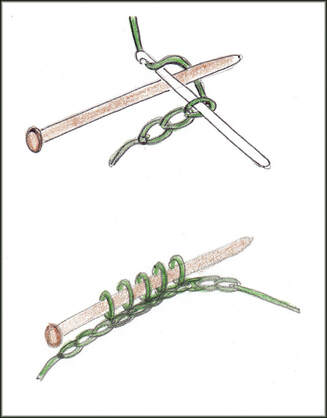
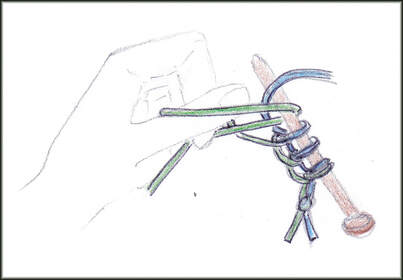
a) The Crochet Provisional Cast‐On
My favourite Provisional Cast‐On is worked with a crochet hook! This is a variation of a technique also known as the Japanese Cast‐On. The provisional version uses two yarns, a Waste Yarn at the beginning and then the Main Yarn following on from there.
So, start with a length of smooth, contrast‐coloured Waste Yarn (WY), shown here in green, and crochet a few chains. Bring your knitting needle into position and hold it in your left hand on top of the yarn.
Tension this yarn end with your left hand, then using the crochet hook, hook the thread over the top of the needle to form the next crochet chain. Flip the thread under the knitting needle again and repeat to make the next chain.
You will see that you are forming a series of WY stitches directly onto the needle and there is a neat chained edge along the bottom. Cast on all the stitches you need, then work a few more chains away from the needle. Pull the last loop a little larger and tighten it so it will not come free while you work. Now bring in your Main Yarn and knit the first row, then continue in your chosen pattern starting with a WS row.
Here's an excellent video from Lucy Neatby showing this method. She starts with a slip‐knot whereas I prefer working a few chains to start off with, but otherwise the methods are the same.
Later, you can return to the crochet WY chain and pull it out from the knitting, capturing the loops one by one as they "pop" off the chain.
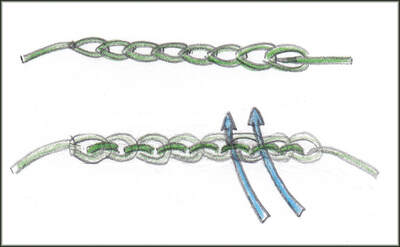
b) The Two‐step Crochet Provisional Cast‐On
This is actually the same as in (a) but is worked in two stages. Firstly, loosely crochet a chain with the WY, allowing one chain per stitch to be cast on plus a few extra at each end. Now look at the back of the crochet chain you have just worked. You will see that while the front is a lovely flat set of "V" shapes, the other side has a bump at the back of each stitch.
Pass the tip of your knitting needle into the space behind one of these bumps, as in the blue arrows in the diagram above, then draw the main yarn through to form the first stitch. Continue picking up stitches directly into the crochet chain until you have the number required. Then start your chosen pattern with a WS row.
Capturing the Provisional Cast‐On stitches later is the same as in (a).
c) False‐start Provisional Cast‐On
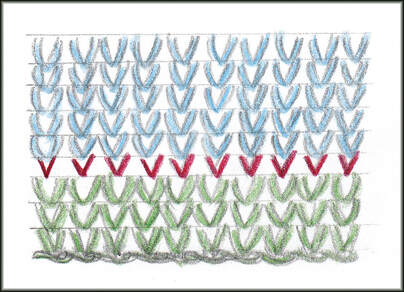
This is a method used by machine knitters but can also be used for hand‐knitting too. In machine knitting it is usually called the Waste Yarn / Ravel Cord Cast‐On.
Start by casting on the number of stitches that you need using any regular cast‐on and some spare yarn. This will be unravelled later and can be used again. Work in stocking stitch for a few rows, ending with a RS row. Then change to a smooth, contrast‐coloured WY and work 1 more row (shown in red above). Bring in the Main Yarn and knit one row, then continue in your chosen pattern starting with a WS row.
Later, pull out the smooth yarn (the Ravel Cord), one stitch at a time, and capture the Provisional Cast‐On loops. This is a little slower method, both to start and to unravel, but is very easy and gives a neat result.
d) Two‐Tail Provisional Cast‐On
This is a variation of the Two‐Tail Cast‐On or Thumb Cast‐On that most knitters know. In fact, many knitters only ever cast on in this way, as it is so versatile.
In this provisional version you will be using two strands of yarn, a WY end and a Main Yarn end. Take both yarns together and make a slip knot. Place this onto the needle and loop the WY around your thumb. If you are an English / American style knitter, throw the Main Yarn around the needle in the usual way to form the stitch. If you are a Continental style knitter, then tension the Main Yarn on your index finger and pick this first stitch. Continue casting on until you have the number of stitches required, not counting the slip knot, then drop the WY.
Next Row (WS): Commence your stitch pattern and work until you reach the slip knot, then drop this off the end of the needle.
Now you can continue on working in your chosen pattern. When you want to capture the provisional cast on stitches, undo the slip knot, gently tease the WY out and capture the live loops. Continue unpicking the WY across the row, trimming this on occasions so that you don't have to pull too much yarn through each stitch.
This is a good provisional cast on and does not come undone suddenly (as can happen with the Crochet Provisional Cast‐On!) but it does take longer to capture the stitches at the end.
You can use this idea of using two yarns instead of one to make a provisional variation of many different cast ons. Have a look in your favourite knitting book and see how easy it would be to work this variation in an Italian or German Cast‐On, for example [Ref 1].
JMCO / Judy's Magic Cast‐On
Judy Becker published a new provisional cast‐on in 2006 which developed some of the ideas from the cast‐ ons above. It has proved extremely popular and has become known simply as Judy's Magic Cast‐On, or just JMCO for short. This produces an excellent cast‐on for toe‐up socks, bags and other items where an invisible cast‐on is required.
It is easiest to work using a circular needle since the back needle tip can be pulled out of the way after the cast‐on, slipping the stitches onto the needle cord behind. Then it is easy to work the first round of stitches.
Descriptions or drawings of the technique can appear a little confused. However, there are many videos of theJMCO, so look at these to see how this might be a good technique to use in your next project. I like this video by Ann Kingstone as she explains the technique excellently.
A Note on Capturing the Stitches at the end
Many of the Provisional Cast‐On methods produce an end stitch which is easy to lose when you come to capture your stitches. In the Crochet Provisional Cast‐On, for example, your very first "stitch" is actually the yarn end hanging at the end of the 1st row. Loop this around your pick‐up needle as you start and pin it into place behind to form the stitch. Then your stitch count will be right. If you forget to do this you will find you are one stitch short!
This has to do with that old Maths question of "How many spaces are there between 6 lamp‐posts?" [Answer = 5!] Isn't it fun delving back into the dim recesses of the brain to remember old Maths lessons... Finally they have found a use after all those years!
Have fun exploring these many different ways of casting on provisionally and finding which one suits you best. In the next blogpost in this series, we'll make a start on knitting our bags.
Next time …
Next time, we'll be making a start on knitting the bag, with a look at the stitches you can use and a some notes all about selvedges.
Until then – Happy Bag Knitting!
Moira
References:
1. Montse Stanley, "The Handknitter's Handbook", pub by David and Charles 1993, Pg 67‐82.
 | Last Blogpost: Market Bag Knit‐along #2 – Yarns & Gauge Next up: Market Bag Knit-along #4 – Stitches & Selvedges Our book: Reversible Knitting Stitches My Website: www.wyndlestrawdesigns.com |
Keywords: Patterns/Bags, Tutorials/BYOB Market Bag Knit-along,
bag, bags, knitted bag, mesh bag, market bag, cotton, yarn, gauge, bag size,
bag, bags, knitted bag, mesh bag, market bag, cotton, yarn, gauge, bag size,
